Have you ever doubted the accuracy of your digital thermometer? Perhaps you’re relying on it to ensure your food is cooked to perfection or to monitor the temperature in your home.
Whatever the reason, knowing how to calibrate your digital thermometer is crucial for obtaining reliable readings. Calibration not only guarantees precision but also enhances the longevity of your device. Imagine the peace of mind you’ll have when you trust your thermometer’s readings implicitly.
By mastering this simple yet essential skill, you empower yourself to make informed decisions based on accurate data. Dive into this guide to discover how easy it is to calibrate your digital thermometer, ensuring it delivers dependable results every time. Your trust in the numbers it displays is just a few steps away.

Credit: www.youtube.com
Importance Of Calibration
Calibrating your digital thermometer is crucial for maintaining accurate temperature readings. Without proper calibration, you risk relying on incorrect data which can lead to a range of issues, from cooking mishaps to serious health hazards. Imagine trusting a thermometer that says your food is cooked, but it’s still raw inside. Calibration ensures reliability and accuracy.
Why Calibration Matters
Think about the last time you checked the temperature of your oven. Was it spot on or did you notice inconsistencies? A poorly calibrated thermometer can mislead you into thinking your cooking appliance is hotter or cooler than it actually is. This can result in undercooked or overcooked meals. Accurate calibration keeps your cooking game on point.
Preventing Health Risks
Health and safety are paramount. An improperly calibrated thermometer can jeopardize food safety, leading to potential health risks. Imagine serving chicken that hasn’t reached a safe temperature; you wouldn’t want your guests to fall ill. Calibration safeguards against these risks by ensuring your thermometer provides precise readings for safe food preparation.
Enhancing Device Longevity
Regular calibration extends the lifespan of your thermometer. Accurate readings reduce strain on the device, preventing wear and tear. It’s like giving your thermometer a health check; ensuring it functions optimally for a longer time. You invest in your tools, so why not ensure they last?
Personal Experience Insight
Picture this: during a family barbecue, my digital thermometer showed the meat was cooked, but cutting into it revealed the truth. The thermometer hadn’t been calibrated in months. That mishap taught me the importance of regular calibration. Have you ever faced a similar situation? It’s a lesson learned the hard way, but it highlights why calibration is non-negotiable.
Simple Steps To Calibrate
Calibrating a digital thermometer isn’t rocket science. It involves checking the thermometer against a known temperature standard, like ice water or boiling water. Follow the manufacturer’s instructions for the best results. It’s a straightforward process that can be completed in minutes, ensuring your thermometer remains trustworthy.
Are you ready to ensure your thermometer is accurate? Regular calibration can save you from countless headaches and potential health risks. Remember, precision matters, and taking these simple steps can make all the difference in your culinary adventures.
Tools Needed
Essential tools for digital thermometer calibration include a reliable reference thermometer, distilled water, and a heat source. A protective case ensures safety during the process, while calibration software aids in precise adjustments.
Calibrating a digital thermometer may sound complicated, but with the right tools, it’s a straightforward process. Having the correct equipment can make all the difference in ensuring your thermometer gives accurate readings. Let’s dive into the essential tools you’ll need to get started.1. Ice Bath
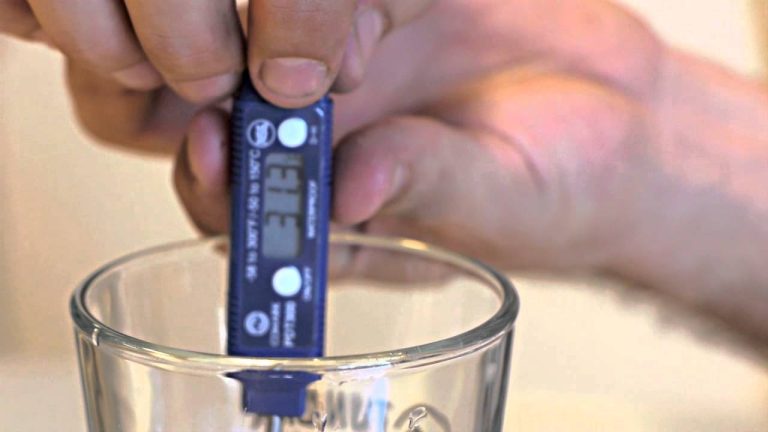
An ice bath is one of the most reliable methods for calibrating a thermometer. Fill a glass with ice, then add cold water until the glass is full. Stir and let it sit for a minute. Place your thermometer in the ice bath without touching the sides or bottom. This setup should read 32°F (0°C). If it doesn’t, you’ll know how much to adjust your thermometer.2. Boiling Water
Using boiling water is another simple calibration method. Bring a pot of water to a boil. Carefully insert the thermometer into the water, ensuring it doesn’t touch the pot’s sides. Your thermometer should read 212°F (100°C) at sea level. Adjust if necessary, keeping in mind that this reading might vary slightly based on altitude.3. Calibration Wrench
Some digital thermometers come with a small calibration wrench. This tool is vital for making precise adjustments. If your device has a calibration nut, this wrench will allow you to tweak it to perfection. Keep it handy when you’re checking your thermometer against the ice bath or boiling water.4. Reference Thermometer
A reference thermometer is a great tool to have on hand. It’s a device that you know is accurate and can serve as a benchmark. Comparing your digital thermometer against this will help you determine any discrepancies. Just make sure your reference thermometer is calibrated itself.5. Instruction Manual
Never underestimate the power of your thermometer’s instruction manual. It often contains specific calibration instructions for your model. It’s your go-to guide for understanding the nuances of your device. Keep it within reach during the calibration process.6. A Stable Surface
Having a stable surface is crucial when calibrating. It ensures your thermometer and tools are safe and secure. A countertop or sturdy table will work well. This minimizes the risk of dropping the thermometer and ensures more accurate readings. Are you ready to calibrate your digital thermometer? With these tools, you’ll be well-prepared to ensure your device is as accurate as possible. What tools do you find most useful in calibration? Let’s get the conversation started in the comments!Preparation Steps
To calibrate a digital thermometer, gather a container of ice water and a pot of boiling water. Immerse the thermometer in each, adjusting settings until readings are accurate. Regular calibration ensures precise temperature measurements.
Calibrating a digital thermometer ensures that it provides accurate readings, which is crucial for various applications, from cooking to scientific experiments. Before you dive into the calibration process, it’s essential to prepare adequately. Proper preparation can make the calibration process smoother and more efficient. Let’s walk through the essential preparation steps to ensure your thermometer is ready to give you reliable results.Gather Necessary Tools And Materials
First, make sure you have all the tools and materials needed. You’ll need a container of ice water and another of boiling water. These will serve as your reference points for calibration. A timer or stopwatch can also be handy to ensure you’re taking readings at the right moments.Clean The Thermometer
Before calibration, ensure your thermometer is clean. Any residue or dirt on the probe can affect the accuracy of the readings. Use a damp cloth with mild soap to wipe it down. Rinse it well and dry with a soft cloth.Check The Battery
A common oversight is not checking the battery. A low battery can result in inaccurate readings. Ensure your thermometer’s battery is fresh and fully charged. Replace it if there’s any doubt about its strength.Understand The Calibration Settings
Familiarize yourself with your thermometer’s calibration settings. Different models may have varying procedures. Refer to the user manual if you’re unsure. Knowing how to access and adjust these settings is crucial for successful calibration.Record Initial Readings
Take initial readings of a known temperature to have a reference point. This could be as simple as placing the thermometer in ice water and noting the reading. This will help you compare the accuracy post-calibration. Are you ready to embark on this calibration journey? Your attention to these preparation steps will pay off in accurate temperature readings every time.
Credit: uk.rs-online.com
Performing Calibration
Calibrating a digital thermometer ensures accurate readings. It is essential for reliable temperature measurements. You can use several methods to perform calibration. Each method uses common household items or devices. Let’s explore these methods below.
Ice Water Method
The ice water method is simple and effective. First, fill a glass with ice cubes. Add cold water until the glass is full. Stir well and let it sit for a few minutes. Insert the thermometer probe into the ice water. Ensure the probe does not touch the sides or bottom. Wait until the reading stabilizes. The thermometer should read 32°F (0°C). If it doesn’t, adjust the calibration settings.
Boiling Water Method
This method uses boiling water for calibration. Boil a pot of water on the stove. Carefully insert the thermometer probe into the boiling water. Avoid contact with the pot’s sides or bottom. Let the reading stabilize. The thermometer should display 212°F (100°C) at sea level. If not, adjust the calibration settings. Altitude affects boiling points. Consider your location’s altitude for accuracy.
Using Calibration Devices
Calibration devices offer precision. They are suitable for professional settings. These devices provide controlled temperature environments. Insert the thermometer into the device. Follow the manufacturer’s instructions. Adjust the thermometer based on device readings. Calibration devices ensure high accuracy.
Verifying Accuracy
Ensuring the accuracy of a digital thermometer is crucial. It determines the reliability of temperature readings. Accurate readings are essential in cooking, healthcare, and scientific research. Calibration helps maintain this accuracy. This involves comparing the thermometer’s readings with a known standard. Let’s explore the steps involved in verifying the accuracy of a digital thermometer.
Step 1: Prepare A Reference Temperature
Start by preparing a reference temperature. Ice water is often used for this purpose. Fill a glass with ice cubes, then add water. Let it sit for a few minutes. This creates a stable temperature close to 0°C or 32°F.
Step 2: Insert The Thermometer
Place the thermometer probe in the ice water. Ensure it doesn’t touch the sides or bottom of the glass. Wait for the reading to stabilize. Compare the reading with the expected reference temperature.
Step 3: Adjust If Necessary
If the thermometer’s reading is off, adjust it. Some digital thermometers have a calibration button. Refer to the device’s manual for instructions. Make small adjustments to align the reading with the reference temperature.
Step 4: Test In Boiling Water
Boiling water provides another reference point. Heat water until it boils. Insert the thermometer probe carefully. Avoid touching the pot’s sides or bottom. The reading should be close to 100°C or 212°F.
Step 5: Record Findings
Document the thermometer’s readings during tests. Note any adjustments made. This helps track accuracy over time. Regular checks ensure dependable temperature measurements.
Step 6: Schedule Regular Calibration
Regular calibration is essential. Set a schedule based on usage frequency. Regular checks ensure consistent accuracy. This practice helps avoid errors in critical applications.
Troubleshooting Common Issues
Calibrating a digital thermometer seems straightforward. Yet, sometimes issues arise. Don’t worry. Troubleshooting can be simple with the right guidance.
Loose Connections
Check the connections first. Loose connections can cause inaccurate readings. Make sure all cables are secure. Inspect the battery compartment. Sometimes, a loose battery disrupts performance.
Inconsistent Readings
Inconsistent readings frustrate users. First, ensure the thermometer is at room temperature. Extreme temperatures affect accuracy. Wait a few minutes before recalibrating. Clean the sensor tip. Dirt or residue impacts readings.
Display Malfunctions
A malfunctioning display can confuse users. Check the battery power. Low power affects display function. Replace the batteries if needed. Reset the device. Sometimes, a simple reset fixes display issues.
Error Messages
Error messages appear occasionally. Refer to the user manual. It provides specific solutions for each error. Recalibrate the device if errors persist. Regular calibration maintains device accuracy.
Maintaining Calibration
Calibrating a digital thermometer ensures accurate temperature readings. Start by placing it in ice water, checking for a 32°F (0°C) reading. Adjust settings if necessary, and repeat with boiling water for accuracy. Regular checks maintain precision.
Maintaining calibration of your digital thermometer is crucial to ensure it delivers accurate readings every time. Without proper calibration, you might find yourself questioning whether that chicken you cooked is really safe to eat or if the temperature in your greenhouse is ideal for your plants. Regular maintenance can prevent these uncertainties and keep your thermometer reliable for everyday use. Remember the last time you had to measure something important, and the numbers just didn’t seem right? Keeping your digital thermometer calibrated can save you from such frustrating scenarios. Let’s dive into practical tips to maintain calibration effectively. ###Regular Testing
Regularly testing your digital thermometer is key to maintaining its accuracy. Make it a habit to check its readings against a known temperature source. A simple method is using ice water, which should read around 0°C (32°F). Create a schedule for these tests. Maybe every first Monday of the month? This ensures consistency and prevents unexpected inaccuracies. ###Cleaning The Sensor
Dirt and residue can affect your thermometer’s readings. Clean the sensor with a damp cloth after each use. This simple task can prolong the lifespan of your device. Avoid using harsh chemicals that might damage the sensor. A bit of mild soap and water often does the trick. ###Storage Practices
Proper storage of your thermometer can also influence its accuracy. Store it in a cool, dry place, away from direct sunlight and moisture. This prevents any unnecessary damage to its sensitive components. Ever left your thermometer in a drawer full of kitchen gadgets? Give it a dedicated spot to avoid bumps and scratches. ###Handling With Care
The way you handle your thermometer can impact its performance. Avoid dropping it or exposing it to extreme temperatures. Such events can throw off its calibration. Think about how you handle your smartphone—carefully and with intent. Apply the same caution to your digital thermometer. ###Professional Calibration
Sometimes, the best approach is to seek professional help. If your thermometer consistently shows inaccurate readings, it might be time for expert calibration. Check the manufacturer’s guidelines for recommended calibration services. Keeping the device in top condition might cost a bit, but it ensures peace of mind. Have you ever found yourself relying on an inaccurate reading at a crucial moment? Implementing these simple strategies can prevent such situations and keep your digital thermometer in check. Remember, a well-calibrated thermometer is not just a tool; it’s a reliable partner in your daily tasks.
Credit: temperature.co.uk
Frequently Asked Questions
How Do You Calibrate A Digital Thermometer At Home?
Fill a glass with ice and water. Stir until cold. Insert thermometer in water. Wait 30 seconds. It should read 32°F (0°C). Adjust if needed using the device’s instructions. Repeat with boiling water for 212°F (100°C).
How Do You Fix An Inaccurate Digital Thermometer?
To fix an inaccurate digital thermometer, calibrate it using an ice bath or boiling water. Replace batteries if calibration fails. Ensure sensor is clean and undamaged. Consult the manual for specific instructions. If issues persist, contact customer support for assistance or consider purchasing a new thermometer.
Do Digital Thermometers Have To Be Calibrated?
Yes, digital thermometers need calibration for accurate readings. Regular calibration ensures reliability and precision in measurements. Follow the manufacturer’s instructions for the calibration process. This maintenance step is crucial for consistent performance and trustworthy results, particularly in medical or scientific applications.
How Do I Know If My Digital Thermometer Is Accurate?
Test your thermometer by comparing it with a calibrated thermometer. Ensure batteries are new and sensor is clean. Check manufacturer guidelines for accuracy. If results consistently differ, consider recalibration or replacement. Proper storage and handling enhance accuracy.
Conclusion
Calibrating a digital thermometer ensures accurate readings every time. A properly calibrated thermometer helps maintain safety and health standards. Follow the steps carefully to avoid errors. Regular calibration keeps your device reliable. Always use clean equipment for the best results.
Remember, accuracy is key in temperature measurements. Check your thermometer’s manual for specific instructions. Keep your thermometer in good condition to extend its lifespan. Regular checks will save time and ensure efficiency. Practice makes perfect, so keep calibrating. Your efforts ensure precision and reliability.
Happy measuring!